SREの本田(@mov_vc)です。
Kaizen Platformではインフラ構築にPulumiを採用し始めています。今回は、Pulumiの基本的な説明+ECS環境をPulumiで構築した手順をまとめました。結論から言うとPulumi、かなり便利なので、導入を考えているよ〜という人はぜひ読んでみてください。
TL;DR
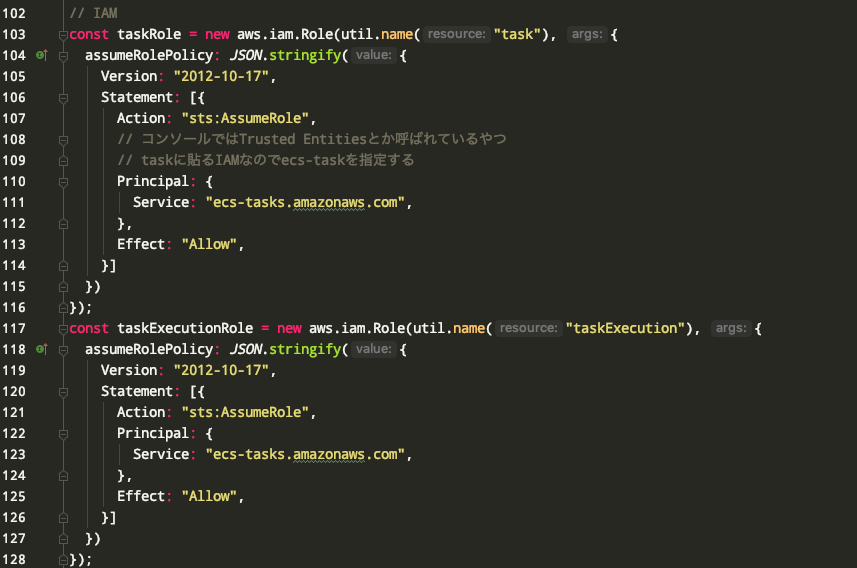
汎用言語で書ける
TypeScript, JavaScript, Pythonで記述できます。
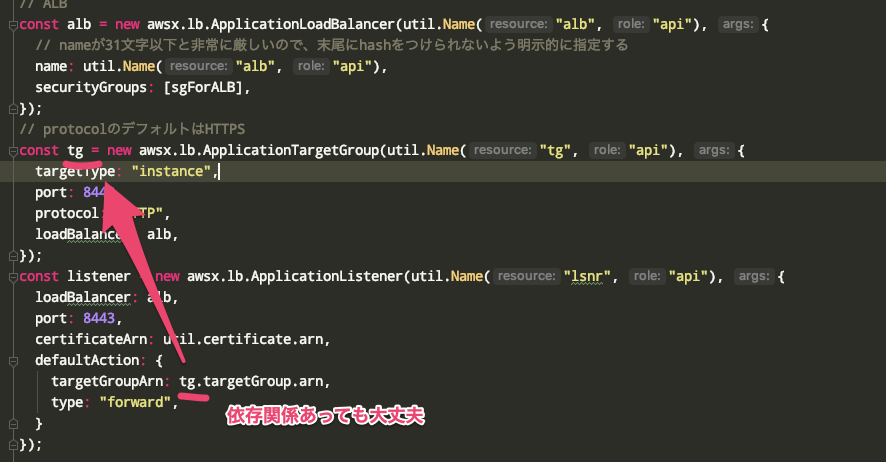
依存関係解決してくれる
リソース間に依存関係があってもPulumiさんがよしなにやってくれます。
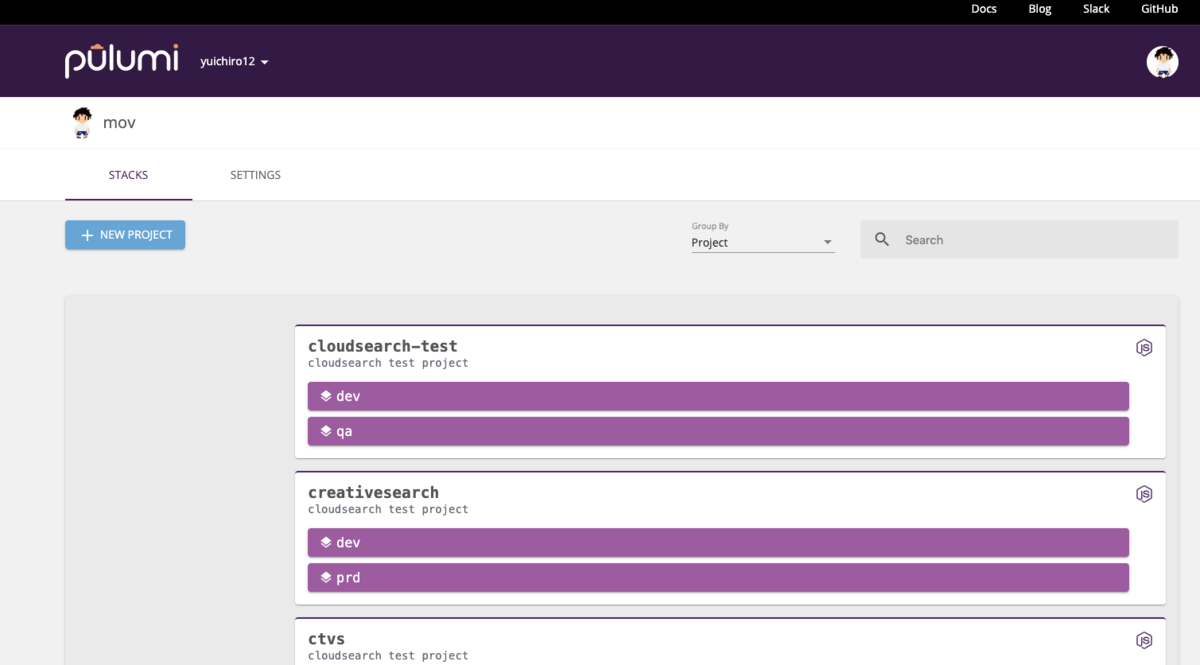
WebUIやべーじゃん
WebUIはこんな感じでプロジェクト、環境一覧画面があり、イケてます。
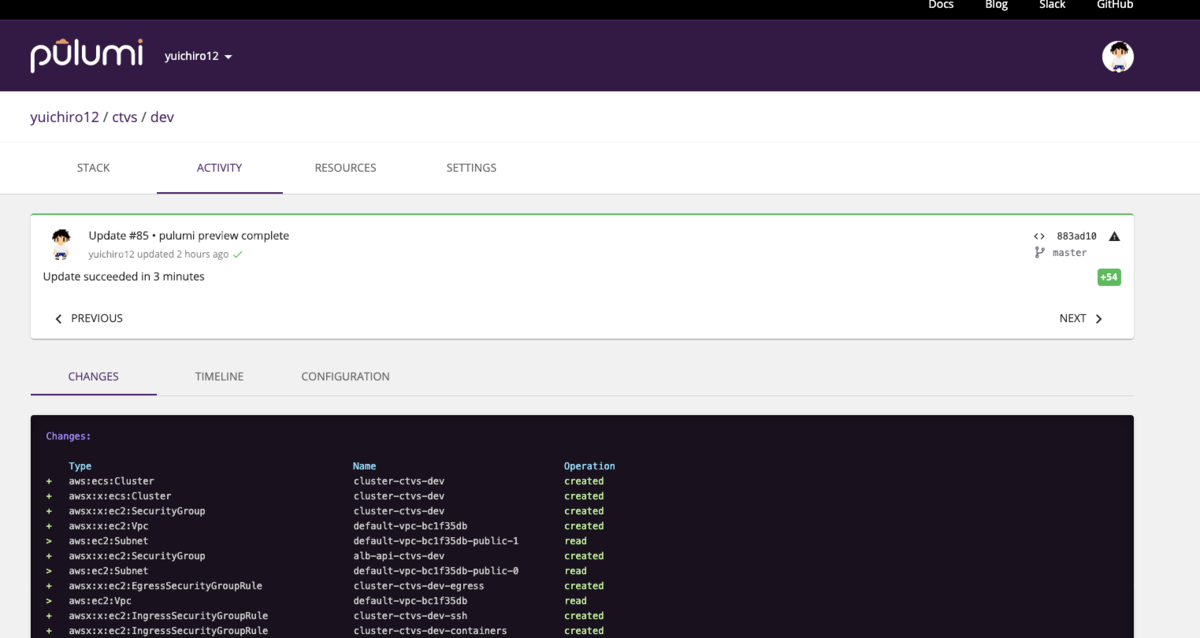
作業履歴とかもWebUIで確認できる
環境ごとのstate情報、Pulumi作業履歴などが確認できます。
開発めっちゃ活発
リリースサイクルが週1ペース。ちゃんと寝てる???
ぷ…Pulumiってなによ…
- Terraformの対抗馬
- 汎用言語でInfrastructure as Codeが実現できるツール
- 2019/11/04現在、公式にサポートされているのはTypeScript, JavaScript, Pythonの3言語
- ちょっとリッチなstate管理が使える
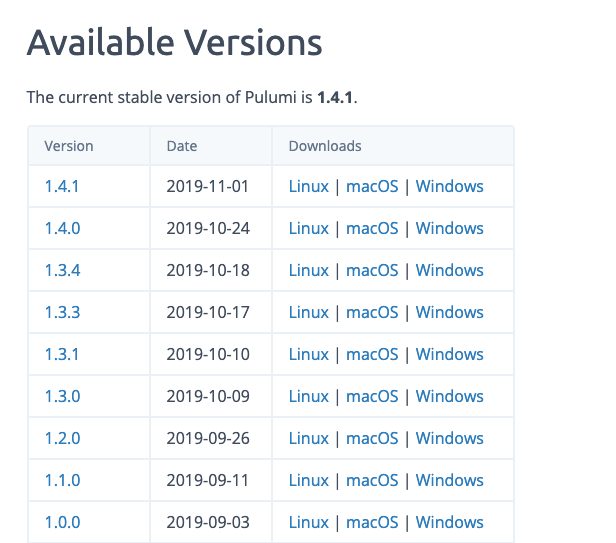
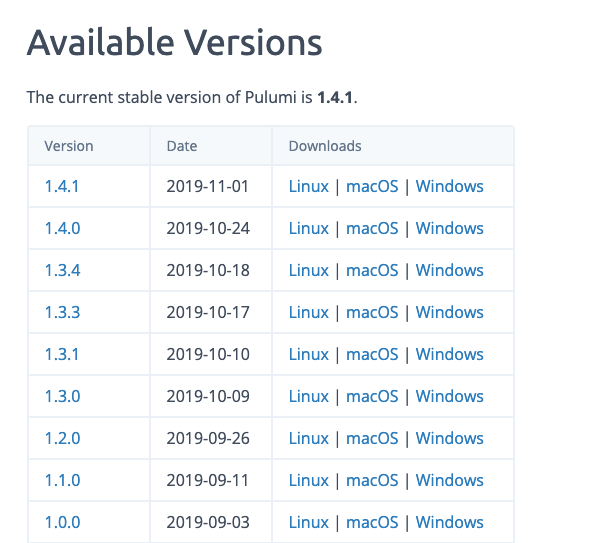
- v1.0.0がリリースされたばかり
- リリースサイクルが短すぎてやばい(ほぼ週1)
公式:
terraformとの比較(公式の主張):
https://www.pulumi.com/docs/intro/vs/terraform/#pulumi-vs-terraform
slackグループ:
Pulumi導入の背景
- Terraformも悪くないが、.tfファイルは記法が独自でややとっつきづらい
- state管理イケてそう
実際に導入してみて
⭕️ メリット
- 汎用言語でIaCできる
- 書いていて楽しい
- webUIわかりやすい
- WebUIから作業履歴が確認できる
- 開発が活発
❌ デメリット
- デフォルトの作り方だとリソース名の末尾にハッシュが付く
- ライブラリが成熟していないため、機能面で不十分なところがある
☁️ 作っていくもの
ECS環境でこの盤面を作るのが目標です。コンテナはなんでも良いのですが、今回はデモ用にnginxを使用しました。
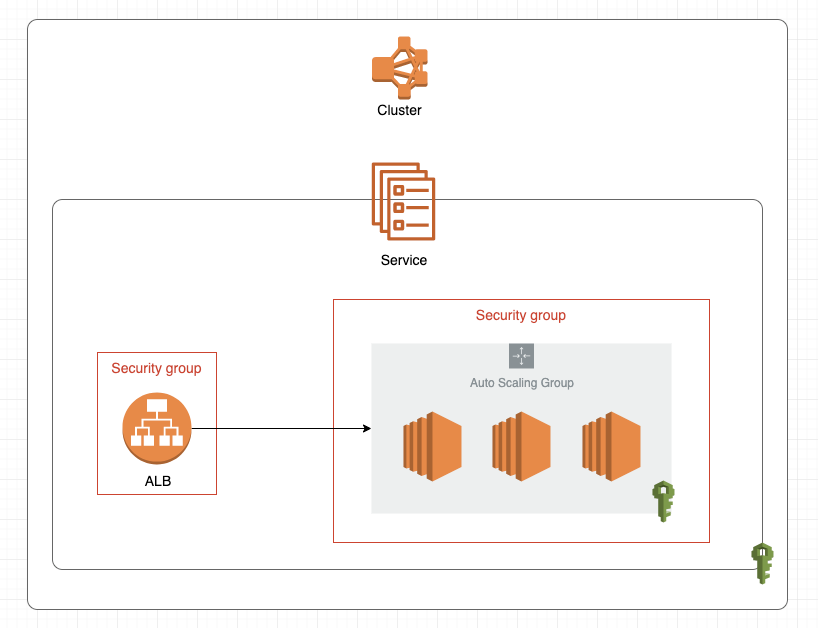
今回、FargateではなくEC2タイプで作っていきたいので、Auto Scaling Groupを作って、Clusterの下に入れたり、ALBのTarget Groupにしたりする必要があります。
リソースの依存関係を考慮して、以下の順序で作っていきます。
- ECS Cluster
- SG
- ALB
- Route53
- IAM
- Launch Configuration
- Auto Scaling Group
- Task Definition
- Service
☁️ どの言語ではじめるか
今のところ選択肢は4つあります。
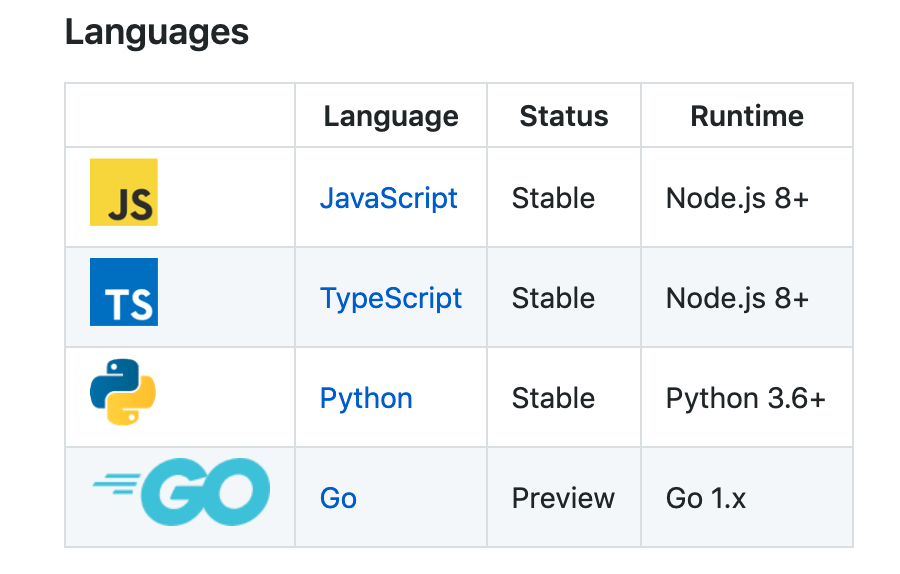
https://github.com/pulumi/pulumi#languages
どの言語でやるか悩ましいが、今回は最も対応が進んでそうなTypeScriptで始めることにしました。というのも、言語固有のissueが2019/09/18時点でTypeScriptは存在しなかったからです。型があるのもよさそう。
- Pythonのissueは3つぐらいあった: language/python3
- Goはもっとある: language/go
- 個人的にはGoのStable Releaseをすごく楽しみにしている
☁️ 用語
stack
- 環境のこと(dev, prdなど)
- 1つのプロジェクトの下には複数のstackを作れる
state
- インフラの状態のこと(「EC2が3台、ALBが1台」など)
state管理
- コードとstateの同一性を保ち、一方から他方への差分更新ができる状態を保つことをいう
- コード変更→インフラ更新 は単純だが、 インフラ変更→コード更新 は難しいので、state管理を実現するためには、インフラとコードの中間のストレージを用意する必要がある
- Pulumiのstate管理方法は3通り
- Pulumiのクラウドストレージを利用する方法
- s3など自前のストレージを利用する方法
- ファイルに保存する方法
AWSリソース
- EC2やIAMなど、AWSが提供する機能のこと
- この記事で「リソース」と言った場合AWSリソースのことをさす
☁️ 環境準備
awscliが入っていて認証を済ませていることを前提に進めます。
まだの人はbrew install awscliしてaws configureしてください。
Pulumiをインストール
$ brew install pulumi
Pulumiにログイン(githubアカウントなどでログインできる)
$ pulumi login
適当にnode.js環境を作る node.jsのpulumiパッケージを入れる
## npm install @pulumi/pulumiとかでもOK
$ yarn add @pulumi/pulumi
空のディレクトリに入ってpulumi newする
$ mkdir cloudsearch-test; and cd cloudsearch-test
$ pulumi new
☁️ 基本操作
よく使いそうなコマンドのメモ
- 作成・更新
$ pulumi up
- プレビュー
$ pulumi preview
- 削除
$ pulumi destroy
- stack作成
$ pulumi stack init prd
- stack一覧
$ pulumi stack ls

NAME  LAST UPDATE  RESOURCE COUNT  URL
dev   n/a          n/a             <https://app.pulumi.com/yuichiro12/creativesearch/dev>
prd*  n/a          n/a             <https://app.pulumi.com/yuichiro12/creativesearch/prd>
- stack移動
$ pulumi stack select dev
☁️ コードをかく
pulumi newすると、index.tsファイルが作られているので、それを編集していきます。
❓ pulumi/awsとpulumi/awsxの違い
以下のようにawsのパッケージがimportされていることを確認します。
import * as aws from "@pulumi/aws";
import * as awsx from "@pulumi/awsx";
コードを読んでみた感じだとpulumi/awsがメインで、pulumi/awsxはそのwrapperみたい。なので基本はpulumi/awsxの方を使って書いていけば良いっぽい。
それぞれのリポジトリ:
https://github.com/pulumi/pulumi-aws
https://github.com/pulumi/pulumi-awsx
❗️ リソース作成のパターン
実はリソース作成の書き方は、どのリソースを作るかに関わらずほとんど決まっており、しかも宣言的です。基本的には以下のパターンです。
const cluster = new awsx.ecs.Cluster(
  "リソースに付ける名前",
  {/* リソース固有の設定 */},
  {/* リソース作成方法の設定 */},
);
第2引数の型だけがリソースごとに異なります。したがってPulumiでのインフラ構築のメインは、この第2引数の部分を丁寧に書いていく作業になります。
⚓️ 命名規則に従う準備
ここからいよいよリソースを作成していきたいのですが、リソース名は命名規則にしたがって作成していきたいものです。以下のようなutil.tsを作ってindex.tsからimportしておくと便利です。
import * as pulumi from "@pulumi/pulumi";

const project = pulumi.getProject();
const stack = pulumi.getStack();

export function name(resource: string):string {
  return `${resource}-${project}-${stack}`;
}
これをindex.tsからimportします。
import * as util from "./util"; // import追記
この他にもvpcの情報とかよく使うメソッドとかを分離して置いておける。汎用言語のパワフルなところ。
⚓️ VPCの準備
sandboxとdevなど、stackごとに別々のVPCを利用していると、VPCの切り替えが必要です。stackを切り替えたらVPCの情報も出し分けられるようにしておきましょう。次のファイルを、 vpc_config.tsとして保存します。
import * as pulumi from "@pulumi/pulumi";
import * as awsx from "@pulumi/awsx";

/**
 * stackごとに違うVPC情報を統一的に提供するファイル
 */

export class Vpc {
  name: string;
  id: string;
  cidrBlock: string;
  subnets: Subnet[];

  getVpcSubnetIds():string[] {
    return this.subnets.map(subnet => subnet.subnetId)
  }
  getVpcSubnetCidrBlocks():string[] {
    return this.subnets.map(subnet => subnet.cidrBlock)
  }

  constructor(name: string, id: string, cidrBlock: string, subnets: Subnet[]) {
    this.name = name;
    this.id = id;
    this.cidrBlock = cidrBlock;
    this.subnets = subnets;
  }
}

export interface Subnet {
  availabilityZone: string;
  subnetId: string;
  cidrBlock: string;
}

export interface Domain {
  name: string;
  certificateArn: string;
  hostedZoneId: string;
}

export class VpcConfig {
  vpc: awsx.ec2.Vpc;
  domain: Domain;
  project: string;
  stack: string;
  keyPairName: string;

  constructor(vpc: Vpc, domain: Domain) {
    this.project = pulumi.getProject();
    this.stack = pulumi.getStack();
    this.domain = domain;

    // VPC
    // vpdIdとsubnetIdから取ってくる
    this.vpc = awsx.ec2.Vpc.fromExistingIds(vpc.name, {
      vpcId: vpc.id,
      publicSubnetIds: vpc.getVpcSubnetIds(),
    });

    this.keyPairName = `${this.stack}-ec2-keypair`;
  }
}
これをutil.tsから利用すれば、stack毎に異なるVPCの情報を外出しすることができます。
import * as core from "./vpc_config";
import * as sandbox from "./stacks/sandbox";
import * as dev from "./stacks/dev";

function getVpcConfig(): core.VpcConfig {
  switch (stack) {
    case "sandbox":
      return new core.VpcConfig(sandbox.vpc, sandbox.domain);
    case "dev":
      return new core.VpcConfig(dev.vpc, dev.domain);
    default:
      throw new Error("undefined stack");
  }
}

// index.tsから利用できるようにexport
export const config = getVpcConfig();
☁️ リソース作成
実際にリソースを作っていきます。
🔨 ECS Cluster
const config = util.config;

// ECS Cluster
const cluster = new awsx.ecs.Cluster(util.name("cluster"), {
  vpc: config.vpc,
  name: util.name("cluster"),
});
🔨 SG
const sgForALB = new awsx.ec2.SecurityGroup(util.name("alb", "api"), {
  vpc: config.vpc,
  // listenerで作成されるので作らない。作るとbattingしてupdate failedする
  ingress: [],
  // Outboundが`All traffic`の場合も明示的に指定しないといけない。terraformのプロバイダもそうなってる
  // 以下の設定で`All traffic`になる
  // 参考: https://www.terraform.io/docs/providers/aws/r/security_group.html#description-2
  egress: [
    { protocol: "-1", fromPort: 0, toPort: 0, cidrBlocks: ["0.0.0.0/0"], ipv6CidrBlocks: ["::/0"] },
  ],
});
const sgForEC2 = new awsx.ec2.SecurityGroup(util.name("ec2", "api"), {
  vpc: config.vpc,
  ingress: [
    { protocol: "tcp", fromPort: 0, toPort: 65535, sourceSecurityGroupId: sgForALB.id },
    { protocol: "tcp", fromPort: 22, toPort: 22, cidrBlocks: ["0.0.0.0/0"] },
  ],
  egress: [
    { protocol: "-1", fromPort: 0, toPort: 0, cidrBlocks: ["0.0.0.0/0"], ipv6CidrBlocks: ["::/0"] },
  ],
});
🔨 ALB
const alb = new awsx.lb.ApplicationLoadBalancer(util.name("alb"), {
  vpc: config.vpc,
  // albのnameは32文字以下と非常に厳しいので、末尾にhashをつけられないよう明示的に指定する
  name: util.name("alb"),
  securityGroups: [sgForALB],
});
const tg = new awsx.lb.ApplicationTargetGroup(util.name("tg"), {
  vpc: config.vpc,
  targetType: "instance",
  healthCheck: {
    path: "/",
    timeout: 10,
  },
  // tgがalbからのforwardingを受けるport(dynamic port mappingの場合はcontainer port)
  port: 80,
  // protocolのデフォルトはHTTPS
  protocol: "HTTP",
  loadBalancer: alb,
});
const httpsListener = new awsx.lb.ApplicationListener(`https-${config.project}-${config.stack}`, {
  vpc: config.vpc,
  name: `https-${config.project}-${config.stack}`,
  loadBalancer: alb,
  // albがlistenするport
  port: 443,
  certificateArn: config.domain.certificateArn,
  defaultAction: {
    targetGroupArn: tg.targetGroup.arn,
    type: "forward",
  },
});
const httpListener = new awsx.lb.ApplicationListener(`http-${config.project}-${config.stack}`, {
  vpc: config.vpc,
  name: `http-${config.project}-${config.stack}`,
  loadBalancer: alb,
  // albがlistenするport
  port: 80,
  defaultAction: {
    type: "redirect",
    redirect: {
      // なぜかintではなくstring
      port: "443",
      statusCode: "HTTP_301",
      protocol: "HTTPS",
    }
  },
});
🔨 Route53
const subdomain = pulumi.getProject();
const containerDNS = new aws.route53.Record(subdomain, {
  name: subdomain,
  aliases: [{
    // 普通の文字列っぽく `dualstack.${dnsName}` とか "dualstack."+dnsName とかしてはいけない
    // 文字列内の変数展開のタイミングでalb.loadBalancer.dnsNameはまだpulumi.Output型なのでエラーとなる
    // したがってこのような場面ではapplyを使うしかないっぽい
    name: alb.loadBalancer.dnsName.apply(dnsName => `dualstack.${dnsName}`),
    zoneId: alb.loadBalancer.zoneId,
    evaluateTargetHealth: false,
  }],
  type: "A",
  zoneId: config.domain.hostedZoneId,
});
🔨 IAM
const taskRole = new aws.iam.Role(util.name("task"), {
  assumeRolePolicy: JSON.stringify({
    Version: "2012-10-17",
    Statement: [{
      Action: "sts:AssumeRole",
      // コンソールではTrusted Entitiesとか呼ばれているやつ
      // taskに貼るIAMなのでecs-taskを指定する
      Principal: {
        Service: "ecs-tasks.amazonaws.com",
      },
      Effect: "Allow",
    }]
  })
});
const taskExecutionRole = new aws.iam.Role(util.name("taskExecution"), {
  assumeRolePolicy: JSON.stringify({
    Version: "2012-10-17",
    Statement: [{
      Action: "sts:AssumeRole",
      Principal: {
        Service: "ecs-tasks.amazonaws.com",
      },
      Effect: "Allow",
    }]
  })
});
const taskExecutionAttachment = new aws.iam.RolePolicyAttachment(util.name("taskExecution"), {
  role: taskExecutionRole,
  // これがないとコンテナを起動できない
  policyArn: "arn:aws:iam::aws:policy/service-role/AmazonECSTaskExecutionRolePolicy",
});
const taskExecutionSSMROAttachment = new aws.iam.RolePolicyAttachment(util.name("taskExecutionSSMRO"), {
  role: taskExecutionRole,
  // コンテナにParameter Storeとかで環境変数バインドする時はこれも必要
  policyArn: "arn:aws:iam::aws:policy/AmazonSSMReadOnlyAccess",
});
🔨 Auto Scaling Group / Launch Configuration
const asg = cluster.createAutoScalingGroup(util.name("asg"), {
  vpc: config.vpc,
  // known bug
  // https://github.com/pulumi/pulumi-awsx/issues/289
  subnetIds: config.vpc.getSubnetIds("public"),
  templateParameters: {
    minSize: 1,
    maxSize: 3,
  },
  // NOTE:
  // autoscaling groupを作成する際は、amiとvolumeを必ず設定すること
  // amiのデフォルトは初代amazonlinux…
  // 新しいamazonlinux2のecs-optimizedは30GBのボリュームが必要なのにもかかわらず、デフォルトの設定でLaunchConfiguration作ると
  // 8GBで設定されてしまい、autoscaling groupは永遠にインスタンスを起動できない状態になるので注意
  launchConfigurationArgs: {
    securityGroups: [sgForEC2],
    ecsOptimizedAMIName: "amzn2-ami-ecs-hvm-2.0.20190913-x86_64-ebs",
    instanceType: "t2.small",
    // /dev/xvda (30 GiB, root device)
    rootBlockDevice: {
      volumeSize: 30,
    },
    // keyPairのこと。keyPairNameと言えよって思ったけど本家のAWSコンソールでも表記揺れしていた
    keyName: config.keyPairName,
    // デフォルトだと /dev/xvdcz (50 GiB), /dev/xvdb (5 GiB) も作られるが、特に無くてもよさそうなので空配列にする
    ebsBlockDevices: [],
    // clusterから作ると手動でUserData入れなくていい
  },
  targetGroups: [ tg ],
});
🔨 Task Definition
const portMapping: aws.ecs.PortMapping = {
  containerPort: 80,
  // dynamic port mapping
  hostPort: 0,
  protocol: "tcp",
};
const container: awsx.ecs.Container = {
  image: `nginx:latest`,
  memory: 1024,
  portMappings: [portMapping],
};
const taskDefinition = new awsx.ecs.EC2TaskDefinition(util.name("taskdef"),{
  // デフォルト値はawsvpc
  networkMode: "bridge",
  containers: {
    nginx: container,
  },
  taskRole: taskRole,
  executionRole: taskExecutionRole,
});
🔨 Service
const service = new awsx.ecs.EC2Service(util.name("service"), {
  name: util.name("service"),
  deploymentMaximumPercent: 200,
  deploymentMinimumHealthyPercent: 100,
  healthCheckGracePeriodSeconds: 5,
  waitForSteadyState: false,
  cluster: cluster,
  taskDefinition: taskDefinition,
  desiredCount: 1,
  loadBalancers: [{
    targetGroupArn: tg.targetGroup.arn,
    containerName: "nginx",
    containerPort: 80,
  }],
});
☁️ pulumi upする
$ pulumi up

    Updating (sandbox):

         Type                                                        Name                                       Status       Info
     +   pulumi:pulumi:Stack                                         ecs-test-sandbox                           creating..   read aws:ec2:Subnet default-public-1
     +   pulumi:pulumi:Stack                                         ecs-test-sandbox                           creating...  read aws:autoscaling:Group asg-ecs-test-sandbox
     +   pulumi:pulumi:Stack                                         ecs-test-sandbox                           creating...  read aws:autoscaling:Group asg-ecs-test-sandbox
     +   │  └─ awsx:x:ec2:Subnet                                     default-public-1                           created
     +   ├─ awsx:x:ecs:Cluster                                       cluster-ecs-test-sandbox                   created
     +   │  ├─ awsx:x:ec2:SecurityGroup                              cluster-ecs-test-sandbox                   created
     +   │  │  ├─ awsx:x:ec2:IngressSecurityGroupRule                cluster-ecs-test-sandbox-ssh               created
     +   │  │  │  └─ aws:ec2:SecurityGroupRule                       cluster-ecs-test-sandbox-ssh               created
     +   │  │  ├─ awsx:x:ec2:IngressSecurityGroupRule                cluster-ecs-test-sandbox-containers        created
     +   │  │  │  └─ aws:ec2:SecurityGroupRule                       cluster-ecs-test-sandbox-containers        created
     +   │  │  ├─ awsx:x:ec2:EgressSecurityGroupRule                 cluster-ecs-test-sandbox-egress            created
     +   │  │  │  └─ aws:ec2:SecurityGroupRule                       cluster-ecs-test-sandbox-egress            created
     +   │  │  └─ aws:ec2:SecurityGroup                              cluster-ecs-test-sandbox                   created
     +   │  ├─ awsx:x:autoscaling:AutoScalingGroup                   asg-ecs-test-sandbox                       created
     +   │  │  ├─ awsx:x:autoscaling:AutoScalingLaunchConfiguration  asg-ecs-test-sandbox                       created
     +   │  │  │  ├─ aws:iam:Role                                    asg-ecs-test-sandbox                       created
     +   │  │  │  ├─ aws:s3:Bucket                                   asg-ecs-test-sandbox                       created
     +   │  │  │  ├─ aws:iam:RolePolicyAttachment                    asg-ecs-test-sandbox-5e4162cd              created
     +   │  │  │  ├─ aws:iam:RolePolicyAttachment                    asg-ecs-test-sandbox-efc8f10d              created
     +   │  │  │  ├─ aws:iam:InstanceProfile                         asg-ecs-test-sandbox                       created
     +   │  │  │  └─ aws:ec2:LaunchConfiguration                     asg-ecs-test-sandbox                       created
     +   │  │  └─ aws:cloudformation:Stack                           asg-ecs-test-sandbox                       created
     +   │  └─ aws:ecs:Cluster                                       cluster-ecs-test-sandbox                   created
     +   ├─ awsx:x:ec2:SecurityGroup                                 ec2-ecs-test-sandbox                       created
     +   │  ├─ awsx:x:ec2:IngressSecurityGroupRule                   ec2-ecs-test-sandbox-ingress-1             created
     +   │  │  └─ aws:ec2:SecurityGroupRule                          ec2-ecs-test-sandbox-ingress-1             created
     +   │  ├─ awsx:x:ec2:IngressSecurityGroupRule                   ec2-ecs-test-sandbox-ingress-0             created
     +   │  │  └─ aws:ec2:SecurityGroupRule                          ec2-ecs-test-sandbox-ingress-0             created
     +   │  ├─ awsx:x:ec2:EgressSecurityGroupRule                    ec2-ecs-test-sandbox-egress-0              created
     +   │  │  └─ aws:ec2:SecurityGroupRule                          ec2-ecs-test-sandbox-egress-0              created
     +   │  └─ aws:ec2:SecurityGroup                                 ec2-ecs-test-sandbox                       created
     +   ├─ awsx:x:ec2:SecurityGroup                                 alb-ecs-test-sandbox                       created
     +   │  ├─ awsx:x:ec2:EgressSecurityGroupRule                    alb-ecs-test-sandbox-egress-0              created
     +   │  │  └─ aws:ec2:SecurityGroupRule                          alb-ecs-test-sandbox-egress-0              created
     +   │  └─ aws:ec2:SecurityGroup                                 alb-ecs-test-sandbox                       created
     +   ├─ aws:lb:ApplicationLoadBalancer                           alb-ecs-test-sandbox                       created
     +   │  ├─ awsx:lb:ApplicationListener                           http-ecs-test-sandbox                      created
     +   │  │  ├─ awsx:x:ec2:IngressSecurityGroupRule                http-ecs-test-sandbox-external-0-ingress   created
     +   │  │  │  └─ aws:ec2:SecurityGroupRule                       http-ecs-test-sandbox-external-0-ingress   created
     +   │  │  ├─ awsx:x:ec2:EgressSecurityGroupRule                 http-ecs-test-sandbox-external-0-egress    created
     +   │  │  │  └─ aws:ec2:SecurityGroupRule                       http-ecs-test-sandbox-external-0-egress    created
     +   │  │  └─ aws:lb:Listener                                    http-ecs-test-sandbox                      created
     +   │  ├─ awsx:lb:ApplicationListener                           https-ecs-test-sandbox                     created
     +   │  │  ├─ awsx:x:ec2:IngressSecurityGroupRule                https-ecs-test-sandbox-external-0-ingress  created
     +   │  │  │  └─ aws:ec2:SecurityGroupRule                       https-ecs-test-sandbox-external-0-ingress  created
     +   │  │  ├─ awsx:x:ec2:EgressSecurityGroupRule                 https-ecs-test-sandbox-external-0-egress   created
     +   │  │  │  └─ aws:ec2:SecurityGroupRule                       https-ecs-test-sandbox-external-0-egress   created
     +   │  │  └─ aws:lb:Listener                                    https-ecs-test-sandbox                     created
     +   │  ├─ awsx:lb:ApplicationTargetGroup                        tg-ecs-test-sandbox                        created
     +   │  │  └─ aws:lb:TargetGroup                                 tg-ecs-test-sandbox                        created
     +   │  └─ aws:lb:LoadBalancer                                   alb-ecs-test-sandbox                       created
     +   ├─ awsx:x:ecs:EC2Service                                    service-ecs-test-sandbox                   created
     +   │  └─ aws:ecs:Service                                       service-ecs-test-sandbox                   created
     +   ├─ aws:iam:Role                                             task-ecs-test-sandbox                      created
     +   ├─ awsx:x:ecs:EC2TaskDefinition                             taskdef-ecs-test-sandbox                   created
     +   │  ├─ aws:cloudwatch:LogGroup                               taskdef-ecs-test-sandbox                   created
     +   │  └─ aws:ecs:TaskDefinition                                taskdef-ecs-test-sandbox                   created
     +   ├─ aws:iam:Role                                             taskExecution-ecs-test-sandbox             created
     +   ├─ aws:iam:RolePolicyAttachment                             taskExecution-ecs-test-sandbox             created
     +   ├─ aws:iam:RolePolicyAttachment                             taskExecutionSSMRO-ecs-test-sandbox        created
     +   └─ aws:route53:Record                                       ecs-test                                   created

    Resources:
        + 61 created

    Duration: 3m24s

    Permalink: https://app.pulumi.com/yuichiro12/ecs-test/sandbox/updates/5
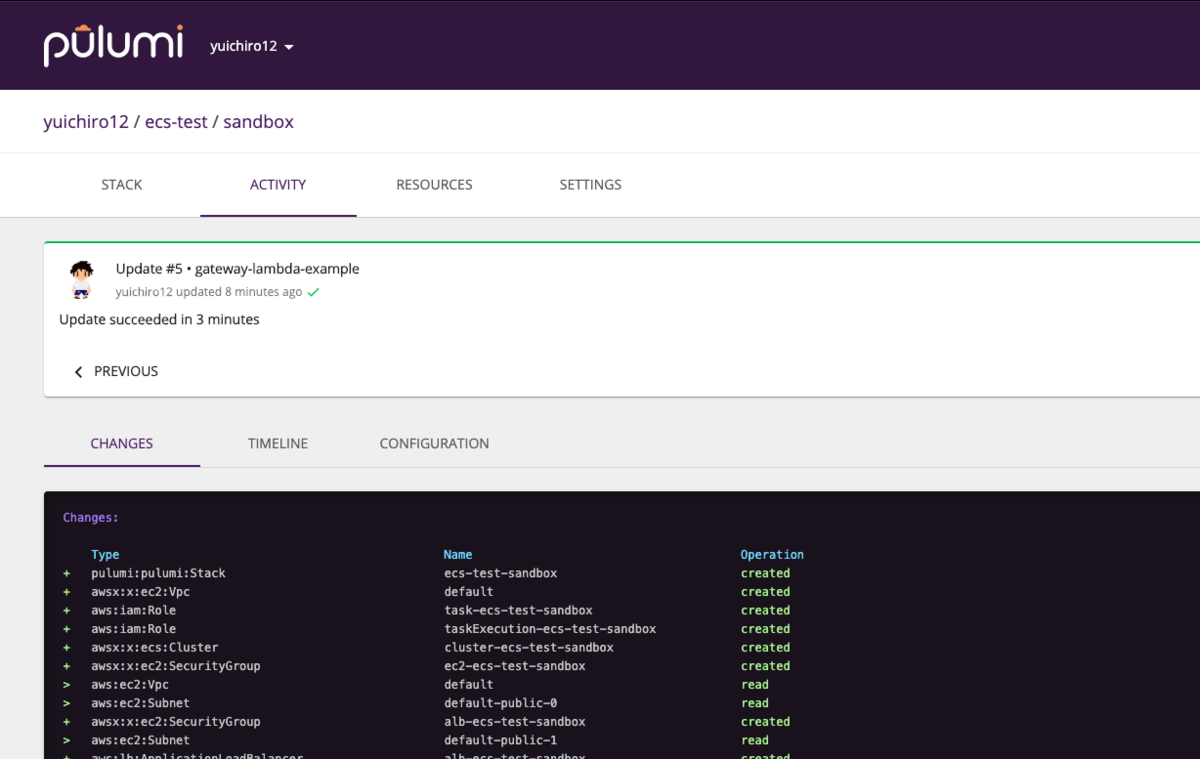
一番下にリンクが出るので、押してみると今回の作業履歴が確認できる。
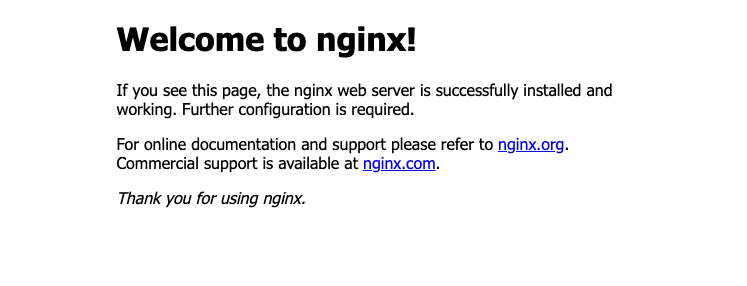
Route53のとこでDNSも当てているので、urlにアクセスすると、nginxの見慣れたページも表示されていることが確認できました。
Terraform、お前だったのか。いつもproviderをくれたのは。
ところでpulumi/awsの中身を見てみると、jsファイルの冒頭にこんなWARNINGコメントがある。
"use strict";
// *** WARNING: this file was generated by the Pulumi Terraform Bridge (tfgen) Tool. ***
// *** Do not edit by hand unless you're certain you know what you are doing! ***
Object.defineProperty(exports, "__esModule", { value: true });
const pulumi = require("@pulumi/pulumi");
const utilities = require("../utilities");
つまり、公式の提供するPulumiのproviderも結局、Terraformのproviderから自動生成されたものらしい。ライブラリの中身のドキュメントが妙に不親切なのはそういうことらしい。
ちなみにコメントで言ってるPulumi Terraform Bridgeはこちら: https://github.com/pulumi/pulumi-terraform
実際設定項目なども全てTerraformと同じなので、設定などで詰まったらTerraformのドキュメントを参照すると良さそうです。
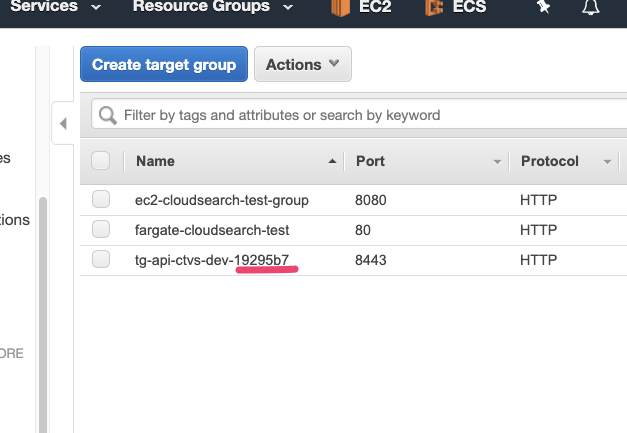
リソース名の後にhash付いちゃうんだが?
例えばこういう感じでTargetGroupを作った場合、
const tg = new awsx.lb.ApplicationTargetGroup("tg-api-ctvs-dev", {
  targetType: "instance",
  port: 8443,
  protocol: "HTTP",
  loadBalancer: alb,
});
以下のようにhashが末尾に付いてしまいます。
このハッシュを消したければ、こうしなければならない。
const tg = new awsx.lb.ApplicationTargetGroup("tg-api-ctvs-dev", {
  name: "tg-api-ctvs-dev",  // nameをもう一度指定
  targetType: "instance",
  port: 8443,
  protocol: "HTTP",
  loadBalancer: alb,
});
デフォルトでhashが付いてしまう理由とメリットは公式から説明があります。 https://www.pulumi.com/docs/intro/concepts/programming-model/#autonaming https://www.pulumi.com/docs/troubleshooting/faq/#why-do-resource-names-have-random-hex-character-suffixes
hashを自動的に付与する機能(auto-naming)は、更新時などにリソースの衝突を避けるためのもので、このauto-namingを利用した場合は、更新の際に一度削除が必要なリソースについても、ダウンタイム無く更新できるというメリットがあります。とはいえ、そもそも作り直さないものや、リソース名を単純にしておきたいものについては、しっかりとnameを指定しておくのがよさそうです。
state管理
普段はクラウドに保存
何も考えずに使っていると、Pulumiは勝手にクラウドにstateを保存してくれます。一方で、stateをローカルに落としてきてファイルとして管理することも簡単にできます。
$ pulumi stack export > state.json
ローカルのstateファイルをクラウドのstateに反映するには次のようにします。
$ pulumi stack import --file state.json
柔軟なstate管理はメリットになるか微妙
現状SREチームがstate管理に力を入れていない理由は、
- state管理をやるとしたら、それが意図した通りに動作しているかどうかテストする必要がある
- apiが対応してないような新しいサービスを利用する場合、変更が手動になるので、クラウドのリソース管理を全てIaCに寄せることは難しい
という2点によります。Pulumiを採用したからといってこれらが解決するものではありません。
サポート、機能追加など
基本的な質問などはslackのPulumiコミュニティで聞いてみるといいです。公式の人が結構即反応してくれます。
slackグループ https://slack.pulumi.com/
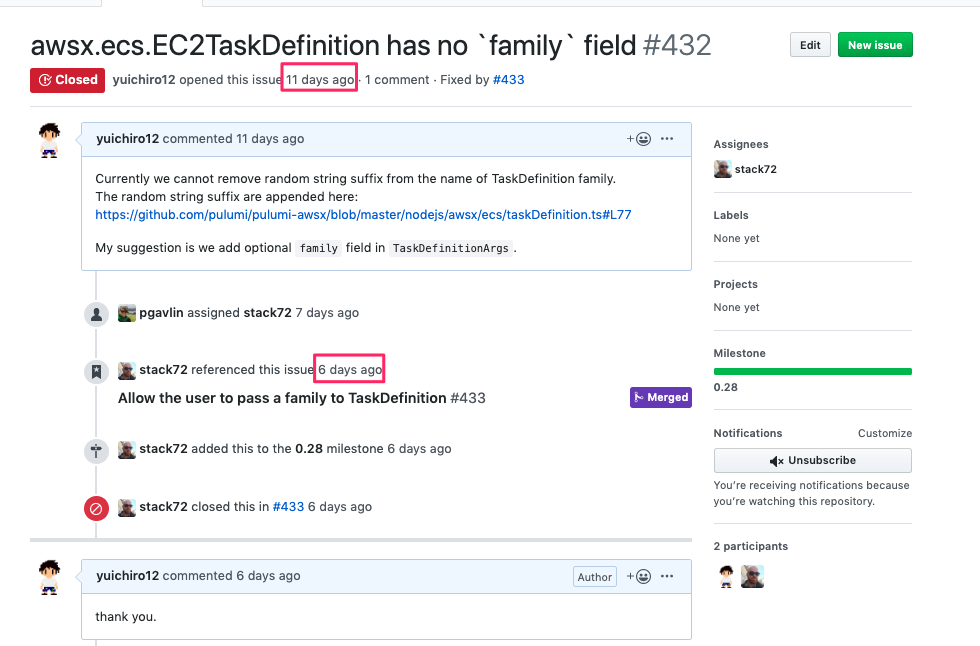
また、クライアントライブラリは全てオープンソースで、開発も活発です。バグや機能追加要望があればissueを立ててみるのもいいかもしれません。私が要望に出した機能は5日で追加してくれました。(ありがとう×100)
利用料
https://www.pulumi.com/pricing/
複数人でstateをまともに管理しようとするとそれなりにお金がかかります。1人あたり$75。
CIアカウントの分だけ有料版買って使うとかがいいのかも。
まとめ
- Pulumiは使いやすくて楽しい
- webUIが今風で便利
- サポートや機能追加早い
インフラをコード化するとできることが増えますね。PulumiをCIと連携すれば、「ブランチ作成してpushしたら環境作成」とかもできそう。一方、設定を誤ると、無駄なリソースが作られてAWSコンソールが汚れてしまうので注意したいです。
余談ですが、型のあるtsで始めてよかったと思います。構築中何度もコンパイルエラーに助けられたので、オススメです(Goのstableリリースを待ちつつ)。
Pulumiについてはもっと紹介したいことがあるのですが、今回はこれぐらいで、需要があれば次回また何か書かせてもらおうと思います。それでは。